Ever feel like your forehand has a parachute attached to it?
Like you’re swinging as hard as you can, but the ball just flutters into the net or worse, sails past the fence?
One of the most popular frustrations I hear from beginners is that their forehand feels inconsistent, underpowered, or just plain awkward.
Maybe your contact point is a mystery. Maybe you’ve watched three YouTube videos and now have five different grips in your head. Or maybe you’re trying to copy Federer’s forehand… and wondering why it looks nothing like yours.
Let’s take a deep breath.
This guide is about learning to hit a clean, consistent, and safe forehand that actually works for you.
This step-by-step breakdown will help you master the fundamentals, avoid pitfalls, and start building a forehand you can count on, even under pressure.
Step 1 – Get Into the Right Ready Position
What Is the Ready Position in Tennis?
Before you ever swing a racquet, your forehand begins with how you stand.
This is called the ready position, and if you skip it or get lazy with it, your shot will break down before it even starts.
Here’s the deal: feet should be shoulder-width apart, knees bent like you’re about to spring into action, and your racquet held loosely out in front of your body.
Think of it like a boxer’s stance.
You’re not frozen, you’re primed – ready to move, shift, and explode toward the ball. Your weight should be on the balls of your feet, not your heels.
Why is this so important? Because tennis is a reaction sport.
The better your posture and anticipation, the more time you create for your shot. And in a game where fractions of a second matter, that’s everything.
Mistakes to Avoid: Standing Flat or Upright
I see this all the time, players standing stiff-legged like they’re waiting for a bus, racquet by their side, hoping the forehand magically happens.
Being “too casual” kills your forehand.
Upright posture leads to late contact, poor balance, and weak footwork. If you want clean, confident forehands, it starts by getting low, staying light, and preparing like a player who’s about to attack, not just survive the rally.
This small adjustment is the foundation every great forehand is built on.
Step 2 – Choose the Right Grip (Eastern vs. Semi-Western)
Which Forehand Grip Should Beginners Use?
Let’s get real: grip confusion is a problem for new players. Should you go with the popular semi-western? Stick with the easier eastern? What’s with all the bevel talk?
Here’s how I simplify it for my students:
- Eastern Grip – Think of it like shaking hands with your racquet. This grip is the most natural for beginners and makes it easier to hit flatter, more predictable shots. It’s forgiving. It works.
- Semi-Western Grip – This is what you’ll see most modern players use. It lets you generate topspin and control, especially against higher bouncing balls, but it’s tougher to learn and often results in hitting the net early on.
Visual Tip #1: The Pancake Flip – Place your racquet flat on the ground and pick it up with the V of your hand on top. Boom – that’s your semi-western grip.
Visual Tip #2: The Handshake Grip – Shake hands with the racquet handle. That’s your eastern grip, and it’s where most beginners should start.
What If the Semi-Western Grip Feels Awful?
Good. That means you’re human.
It’s completely normal to feel off when trying the semi-western grip for the first time. You’ll likely hit the net a lot. You might even curse my name (please don’t).
Here’s your escape hatch: Start with the eastern grip, then progress toward semi-western once you’re making clean contact.
Some players take days. Others take weeks. What matters is that you’re building confidence, not frustration.
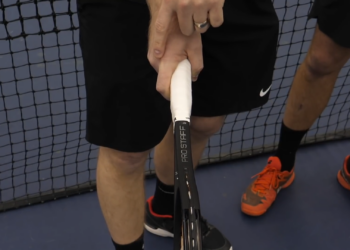
How to Hold the Racquet the Right Way
Let’s walk it out:
- Place your racquet flat on the ground.
- Grab it naturally like you’re picking up a frying pan.
- Check the “V” between your thumb and index finger this tells you which grip you’re in.
- The racquet face should feel stable but relaxed.
Final test? Someone should be able to pull the racquet out of your hand. If you’re squeezing it like a crowbar, you’ve got what we call the “death grip” and that kills feel, fluidity, and fun.
Relax. Trust your hand. The racquet’s not going anywhere.
Step 3 – Learn the Forehand Swing Path
Start With the “Pet The Dog” Move
We’ve got a cue that sounds silly, but works like magic for beginners: “Pet the dog.”
Here’s how it goes: After you turn your shoulders and start your swing, your racquet should drop behind you like you’re reaching back to pet a giant dog walking next to you.
This creates what’s called racquet lag, which is key for generating effortless power and topspin.
Too many beginners try to muscle the ball with a stiff arm. But this “pet the dog” motion keeps your racquet below the ball, allowing you to swing up through contact and brush the ball from low to high.
That brushing action? That’s how you get spin and lift and stop dumping shots into the net.
The Four Stages of the Swing (Ready → Turn → Swing → Follow Through)
Let’s break the forehand down into four easy checkpoints:
- Ready – Racquet in front, knees bent, eyes locked in.
- Turn – Rotate your shoulders and hips together. Racquet swings back with your body, not just your arm.
- Swing – Drop the racquet (pet the dog), swing low to high, and aim to meet the ball in front of your body around waist or hip height.
- Follow Through – Your racquet finishes across your body, around shoulder height.
The contact point is critical: you want to strike the ball just in front of your front hip.
Hitting it too close to your body makes your shot weak and late, like swatting at flies instead of swinging with intent.
What’s a Good Follow-Through for Beginners?
You might watch Nadal finish high over his head or Federer tuck the racquet by his ribs, but for beginners, there’s one go-to move: the windshield wiper.
After contact, let your racquet finish naturally across your body around shoulder height.
The motion is smooth and horizontal, like wiping a car windshield. If you’re hitting the net? Finish higher. That lift helps the ball clear the net with more safety and spin.
And remember, there’s no “perfect” follow-through for every shot. But for now? Consistent contact and a high, clean finish are your best friends.
Step 4 – Make Consistent Contact (Without Rushing)
Why You Keep Hitting the Net
So you’ve got the grip. You’re doing the “pet the dog” move. But for some reason, the ball keeps slamming into the net like it owes you money.
Here’s what’s probably going wrong:
- Too much grip tension – You’re squeezing the life out of the racquet. That “death grip” kills racquet speed and feel.
- Racquet face is too closed – If your strings are pointing toward the ground at contact, you’re sending the ball straight into the net.
- No follow-through – If you stop your swing after hitting the ball, you’re not giving it the arc or spin it needs to lift over the net.
Fix it with this cue: At contact, your strings should be slightly closed, not totally flat or facing down. Just enough to brush the ball and create topspin, but open enough to get the ball up and over the net.
Clean Contact = Ball in Front + Relaxed Grip
A lot of beginners think swinging harder is the answer. Spoiler alert: it’s not.
The truth is, clean contact beats fast contact every single time.
Here’s the formula:
- Meet the ball out in front of your body—not jammed into your hip or belly.
- Stay relaxed. A tense swing is a jerky swing, and jerky swings are wildly inconsistent
Imagine swinging a hammer. If you’re stiff and nervous, you miss the nail. But if you’re smooth and confident, bam – you drive it clean. Your forehand works the same way.
Don’t swing harder – swing smoother. That’s how you make the ball listen.
Step 5 – Add Spin and Power (Safely)
When Should You Add Topspin?
Look, we all want to hit those heavy, loopy forehands that kick off the court like Rafa’s. But here’s the truth: if you’re not hitting clean yet, it’s too soon to chase topspin.
Topspin is a tool, not a shortcut.
Trying to force spin before you’ve mastered contact usually just leads to mishits, timing issues, and frustration. You end up brushing the side of the ball, hitting weak floaters, or over-rotating your wrist into chaos.
So when should you start?
Once you’re consistently meeting the ball in front, finishing your swing high, and feeling in control of your contact. That’s when the low-to-high path starts working for you instead of against you.
If you’re still dumping balls into the net or spraying them long, focus on control first.
Spin can wait. It’ll come naturally when your technique is ready.
The Safe Way to Generate Power
Real power comes from your legs, hips, and core. Not your arm. Not your wrist.
Think of your body like a spring, you coil with your shoulder turn, then uncoil as you drive through the shot.
That kinetic chain transfers energy from the ground up into the ball.
Start with these cues:
- Bend your knees.
- Rotate your hips with your shoulders.
- Push off your back leg.
Power is about using your whole body, efficiently. Power without control? That’s just chaos.
But when you move right, the ball pops off your strings with zero extra effort.
Bonus: 3 Beginner Drills to Build a Reliable Forehand
You’ve got the fundamentals down, but practice is where the real progress happens.
Here are three beginner-friendly drills PlayYourCourt uses to help players groove their forehand fast, without building bad habits.
1. Short-Court Forehand Warm-Up
Goal: Build clean contact and timing without needing full power.
- Stand 5–6 feet inside the baseline.
- Rally with a partner or coach using only half the court.
- Focus on soft, controlled swings with a relaxed grip.
- Emphasize hitting in front and finishing high.
This drill trains your mechanics without the pressure of full-court distance. It’s a great way to build confidence before stepping back.
2. Shadow Swing + Pet-The-Dog Sequence
Goal: Ingrain the proper swing path and footwork.
- Stand in front of a mirror or use your phone to film yourself.
- Practice the swing in slow motion: ready → turn → pet the dog → contact → follow through.
- Repeat 10–15 times, then hit 5 actual balls.
This drill hardwires muscle memory without the distractions of live ball timing. Think of it as “mental reps” for your body.
3. Target Practice with Cones
Goal: Improve directional control and consistent depth.
- Place 3 cones in your opponent’s court: one deep cross-court, one deep down the line, one mid-court.
- Feed yourself balls (or have a partner feed) and aim for each cone in sequence.
- Prioritize spin and shape over speed- accuracy first.
This helps train court awareness while building the habits of hitting to something, not just at the court.
Pro Tip: Don’t just “hit balls.” Practice with intent. And if you’re not sure where to focus, our PlayYourCourt coaches can build custom drill plans based on your swing, rating, and goals.
Fix These 3 Beginner Mistakes Instantly
Sometimes the quickest wins come from eliminating the wrong moves, not just adding the right ones.
If you’re struggling with control, timing, or consistency, chances are you’re making at least one of these beginner mistakes. The good news? They’re incredibly easy to fix.
Mistake #1: Swinging Too Hard Too Early
You want power. I get it. But swinging like you’re trying to crush the ball actually leads to less power and zero control.
You lose your balance, mistime the ball, and send it flying – if you make contact at all.
Fix it: Focus on smooth, relaxed swings with proper technique. Once you’re hitting clean, power comes naturally from body rotation and timing, not brute force.
Mistake #2: Holding the Racquet Too Tight
If you’re squeezing your racquet like a vice grip, you’re suffocating your swing. A tight grip limits mobility, causes mishits, and leads to early fatigue.
Fix it: Think of your grip pressure on a scale from 1 to 10. You should be at a 3 or 4 max. Loose enough for someone to pull the racquet out of your hand, firm enough to stay in control.
Mistake #3: Looking Up Too Soon After Contact
You hit the ball, then lift your head to see where it’s going… and oops, it flies into the net or dribbles off your frame.
✅ Fix it: Keep your head down and your eyes on the contact point through the swing. The ball will go where it’s supposed to, you don’t need to watch it immediately.
Trust your swing and let your body finish the motion before you peek.
Master these three, and you’ll feel a difference instantly.
Small tweaks, big gains. And if you’re ready to take it further, our PlayYourCourt coaches are just a few clicks away with drills and video feedback tailored to your game.
Your Next Step: Build Your Forehand (With Help That Works)

You’ve made it this far, you’re not just dabbling, you’re serious about getting better.
You’ve learned the ready position, how to choose the right grip, how to swing like a pro-in-training, make clean contact, and even add power and spin the right way.
Now here’s the truth: you don’t have to figure this all out alone.
PlayYourCourt helped thousands of players break through forehand frustration with coaching that’s built for real life – not just highlight reels.
Whether you’re stuck hitting the net, overwhelmed by conflicting grip advice, or tired of getting no results from random YouTube tips, we’ve got your back.
Explore our membership and get access to everything you need to improve faster, from in-depth video analysis and live challenges to practice partner matchmaking, gear discounts, and guided courses from top coaches.
You’ve got the foundation. Now let’s build the forehand you’ve always wanted – together. 💪🎾


