
The one-handed backhand isn’t easy. That’s why most players, especially under pressure, default to two hands. The two-hander gives you built-in stability, more forgiveness on timing, and a quicker path to consistency.
But here’s the trade-off: the one-hander gives you reach, disguise, slice versatility, and when done right, a level of effortless power that makes people stop and stare.
There’s a reason pros like Wawrinka and Thiem make it look so devastating. It can be both elegant and explosive, if you know how to unlock it.
This guide is for players in transition, maybe you’re an intermediate ditching the two-hander, or an advanced player whose one-hander feels more decorative than dangerous. If your backhand feels awkward, inconsistent, or straight-up weak, you’re in the right place.
We’re going to break it all down: the grip, the slot, the swing path, and the footwork. We’ll bust the myths that keep your stroke stuck, fix the mistakes that sap your power, and give you the drills to groove your motion.
This is more than a guide, it’s a full blueprint to transform your one-hander from a liability into a weapon.
Why Choose the One-Handed Backhand?
Let’s get one thing out of the way: the one-handed backhand is not just for the tennis romantics.
Sure, it looks beautiful, fluid, smooth, almost poetic, but it’s also practical.
When trained properly, it becomes a surgical tool: precise, powerful, and unpredictable.
So why go one-handed in a world where almost every pro under 30 hits with two?
The Upside: Reach, Slice, and Disguise
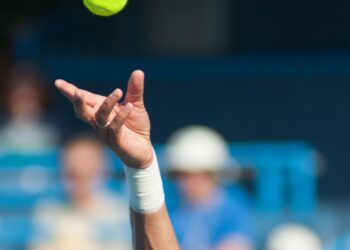
First, the reach. With one hand, you can extend out farther than you ever could with two.
That extra range gives you more options on wide balls and makes your opponent cover more court.
Then there’s the slice. With a one-hander, the slice is a strategic weapon. You can chip low, float deep, or carve sharp angles with ease. Two-handers can slice, sure, but not with this kind of feel and variation.
Lastly, disguise. A good one-hander makes it tough for your opponent to read what’s coming.
You can show topspin, slice, or drive, all from the same setup. That kind of deception buys you time and creates mistakes. And at higher levels, time is everything.
The Downside: High Balls & Steep Learning Curve
Of course, it’s not all roses. The one-hander is notoriously hard to master. It’s less stable than a two-hander, especially on high balls, and timing is absolutely critical.
You don’t just swing, you load, drop, lag, extend, and lift, all in the blink of an eye. That’s why most players struggle with consistency early on.
But here’s the deal: once you groove it, the payoff is huge. You get more options, more spin, and more court coverage. You just have to get through the ugly phase first.
When (and Why) You Might Want to Switch
If you’re a two-hander feeling stuck, maybe your backhand feels cramped, robotic, or lacks penetration, it might be time to explore the switch. Especially if you’re dealing with wrist or shoulder issues, or just want more creative tools in your game.
You don’t have to give up the two-hander completely, but developing a one-hander as your main stroke or even just a secondary option can open up a new layer of control and shot-making
One-Handed Backhand Fundamentals
Mastering the one-handed backhand starts before you even swing.
If your grip is off or your feet are late, the rest of the stroke doesn’t stand a chance.
So let’s lay the foundation the right way, with the two most overlooked elements: grip and footwork.
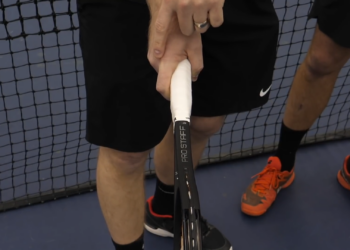
Grip Setup – The Foundation
If you’re going to own a one-handed backhand, the Eastern backhand grip is your best friend. It gives you the ideal racquet angle to generate topspin, drive through contact, and control the ball on both low and high shots.
How to Find the Eastern Grip Naturally
Hold your racquet in your non-dominant hand and place your dominant hand flat on the strings like you’re “shaking hands” with the frame.
Slide your hand down onto the handle, making sure the base knuckle of your index finger and the heel pad of your hand land on bevel 1 (the top bevel when the racquet is standing perpendicular to the court). That’s your Eastern backhand grip.
Over-Rotating the Grip
A lot of players, especially those switching from two hands, go too far around the handle, ending up with a grip that’s way too Western.
It feels strong at first, but it locks your wrist and makes it nearly impossible to get the right racquet path. On the flip side, a grip that’s too straight (Continental) will kill your topspin and turn your drive into a bunt.
Footwork & First Move
Here’s a truth bomb: your first step often decides whether your backhand’s going to sing or shank. Without the right setup, you’ll end up slapping the ball late, off-balance, or with no power.
Step Left with Toe Parallel to the Baseline
From the ready position, your first move should be a small step out with your left foot (for righties), landing so your toe is parallel to the baseline. This immediately starts your unit turn and sets up a clean racquet path.
Why Stepping Across > Stepping Forward
A lot of players are taught to step into the ball. That sounds good in theory, but for the one-hander, stepping across creates something far more valuable: coil.
When you step diagonally across your body, think 45 degrees instead of straight ahead, you engage your hips and shoulders. You load the torso like a spring.
And when you uncoil? That’s where the whip-like power comes from.
Why Does Stepping Across Help So Much?
Simple: it creates space.
Forward steps crowd your swing and force you to jam the racquet. Stepping across opens your torso, gets the racquet further behind your body (into the slot), and allows you to swing out, not just through. .
If you nail the grip and footwork, you’ve already solved 80% of the one-hander puzzle.
The Swing Path & Mechanics
If grip and footwork are your foundation, this is your engine room.
Most one-handers fall apart here, especially when players get stuck in D-alignment, where the racquet stays on the same side of the body, forming a stiff “D” shape that kills power and spin.
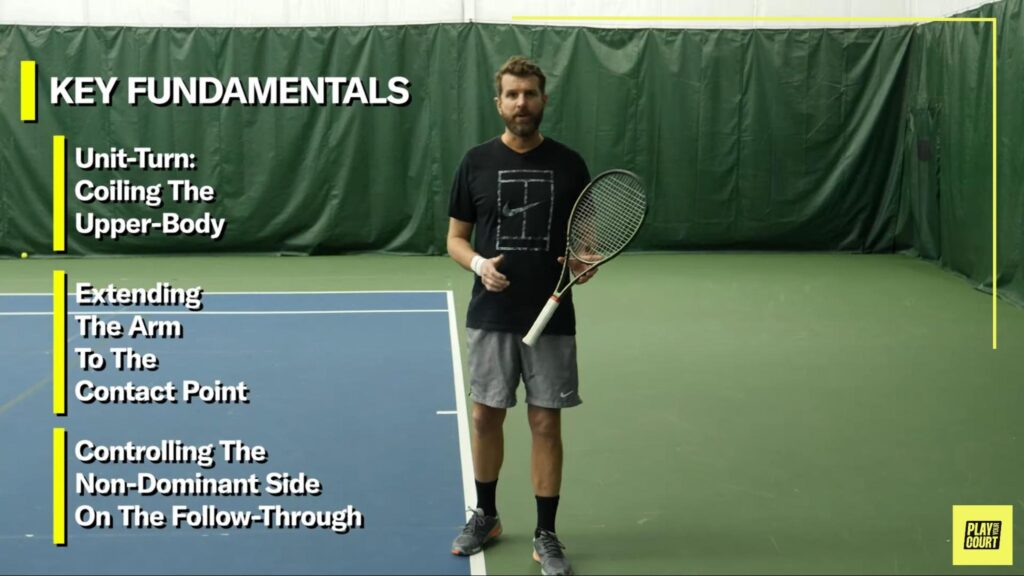
The Unit Turn & D-Alignment Fix
To break free, start with a true unit turn. Rotate your shoulders,not just your arm, with both hands on the racquet, keeping the tip up. Your chest should begin to face away from the net, loading your torso like a spring.
The non-dominant hand plays a huge role: it guides the racquet into the right position and prevents early separation.
At the end of your turn, the racquet should still be on your non-dominant side, not swinging across too soon.
Worried about where your racquet should drop? That’s the slot, the key to creating natural lag.
Let your racquet fall behind your hip with the butt cap pointing at the ball. That’s your power window.
Finding the Slot & Creating Lag
The slot is your launchpad. Most rec players swing hard but never reach this position, which is why their backhands feel weak.
When you drop behind the hip, stay relaxed, and delay your swing until fully coiled, you generate whip and effortless racquet head speed.
Racquet Drop & Elbow Position
Some pros start high (Federer), others low (Wawrinka). Either works, but your elbow should rise above your wrist by the time you hit the slot.
Let gravity and extension drive the drop, not force.
Dropping too early is a “do not”.
This rushes your swing, flattens your path, and kills spin. Instead: coil first, drop second, extend third.
That sequence is the secret to a clean, powerful one-hander.
Contact Point & Extension
If the unit turn and slot set the stage, contact and extension are where the magic happens. This is the split-second where everything you’ve set up either delivers spin and drive, or fizzles into a floaty sitter.
Optimal Contact Zone
The contact point on a one-handed backhand isn’t one-size-fits-all. It varies depending on whether you’re hitting topspin or slice, and getting it right is critical to making your stroke feel clean, strong, and effortless.
Topspin: Contact in Front and Close
For a topspin drive, you want to make contact slightly in front of your front hip and just close enough that your arm is nearly (but not quite) extended.
If the ball gets too close, you’ll jam yourself and pull the racquet across your body. Too far out, and you lose control and can’t lift the ball.
Slice: Contact Farther and Later
For a slice, your contact should be farther out and slightly later, allowing you to cut under the ball cleanly. The further contact point gives you room to “carve” the ball and keep it low.
If you try to hit the slice like a topspin, too early or too close, you’ll likely open the racquet face too much and float the shot.
Body Orientation: Diagonal vs. Sideways
Your body alignment changes with your shot type.
On topspin drives, your torso should be angled diagonally toward the net, allowing your swing to come up and through.
For slices, stay more sideways, keeping your chest closed to the net. This helps maintain racquet stability and prevents over-rotation.
Straight Arm = Control & Power
Here’s one of the biggest differences between an average one-hander and a great one: extension.
If your arm is bent at contact, your swing loses power and control. You’re basically cutting the swing short and forcing the ball, which leads to weak shots and more errors.
Why a Bent Elbow Hurts Your Backhand
A bent elbow limits how far the racquet can swing out, which means less spin, less depth, and more stress on your wrist and shoulder.
This is why so many players say, “My one-hander feels weak even when I swing hard.”
What You Want Instead: Reach and Lift
You want your arm to be straight but relaxed at contact. Not stiff, but fully extended, reaching out and lifting the ball.
This gives you the best chance to hit deep, spin-heavy shots that drop inside the baseline instead of floating long or into the net.
Easy Cue: “See Under Your Strings”
Here’s a simple tip from our PlayYourCourt coaching: after contact, you should be able to see under your strings. That means your racquet is moving up through the ball, not across. If you can’t see under the strings, you’re probably swinging flat or pulling too early.
A one-handed backhand is all about precision. One small mistake, like bending the elbow or swinging too soon, and the whole shot falls apart.
But when you get that full extension just right? That’s when the ball jumps, curves, and feels buttery smooth. That’s the shot we’re helping you build.
Follow-Through & Finish
Once you’ve made contact, your job isn’t done. In fact, your follow-through often tells the full story of what happened in your swing.
A strong finish isn’t just for style points, it’s how you lock in spin, depth, and accuracy.
Let’s look at how to finish both your topspin and slice one-handers the right way.
Topspin Backhand Finish
For a solid topspin backhand, your arm should extend up and across your body, finishing high over your shoulder or opposite collarbone.
This follow-through creates the arc and dip you need for heavy spin and consistent depth.
But here’s the key: your chest should stay closed to the net until your arm has fully extended.
If your chest opens too early, your swing pulls across your body, and that’s when you hit shanks or frame the ball wide.
Slice Backhand Finish
Your slice finish is very different, it’s shorter, firmer, and more compact. You’re not taking a big swing; you’re driving through the ball in a controlled motion.
The racquet face goes from slightly open (during prep), to neutral (at contact), then back to slightly open again as you finish.
Think of it like carving through the ball, not chopping or slapping.
Your wrist stays firm the entire time. A floppy wrist leads to floaty slices and zero control. Keep it stable and guide the racquet through with your shoulder and forearm.
Whether you’re ripping topspin or skimming a slice, the follow-through tells you if the rest of your swing was solid. If your finish feels clean and balanced, chances are your shot was too.
Mistakes to Avoid
Not Using the Non-Dominant Hand
The biggest flaw, across beginner to advanced players, is not using the non-dominant hand to guide the racquet during the setup.
Without it, you lose your shoulder turn, your racquet head drops too soon, and your swing becomes all arm.
Fix: Start your unit turn by pulling the racquet back with your non-dominant hand. This creates coil, helps lift the racquet into position, and sets you up to create lag and leverage.
Starting the Racquet Too Low
Players often begin their swing with the racquet down by their hip or waist, especially when the ball is already rising.
This forces them to lift up on a ball that’s already high, leading to mishits, poor timing, and weak contact.
Fix: Start with the racquet head high, especially when preparing for higher balls. This gives you space to drop into the slot, stay loose, and hit the ball earlier without backing up or losing court position.
Elbow Too Low in the Backswing
Elbow dropping in the takeback, which killes leverage and makes the swing feel cramped. This mistake shows up in intermediate and advanced players alike.
Fix: Lift your elbow higher during the takeback. One cue Nate found helpful? Place a finger on the strings during the turn, it raises both the racquet head and the elbow, keeping everything in a powerful, connected position.
Letting the Left Arm Follow the racquet
After contact, many players let their non-dominant arm swing forward with the stroke. This throws off balance and disrupts the finish, especially when trying to rise with the ball.
Fix: Keep the non-dominant arm anchored back as long as possible. Whether you hold it like Federer or let it drop like Wawrinka, the key is to avoid it chasing the racquet forward. That forward pull creates early rotation and weakens the finish.
Taking the Ball Too Late on High Shots
Two-handers let you muscle through high balls, but with a one-hander, late contact means trouble. Without the right setup, high balls force you into defensive positions.
Fix: Step in, take the ball early, and rise with your swing. Setting the right foot early and stepping across helps you take time away from your opponent and stay in control, even against high bounce or kick serves.
These are battle-tested lessons from a coach who’s living through the same challenges you are. If you’ve made any of these mistakes, good news: you’re in the majority. Better news? You now know how to fix them.
Drills to Improve Your One-Handed Backhand
You don’t need a hitting partner or a private lesson to level up your one-hander. With the right drills, and just a little floor space or a wall, you can start fixing mechanics, building muscle memory, and adding spin and control to your backhand starting today.
Below are drills broken down by skill level to help you groove your stroke step by step.
Beginner Drills
These drills are all about learning the correct sequence: coil, slot, extend. If you’re just starting out or rebuilding from scratch, start here.
1. Step-Coil-Slot Shadow Swings
No ball. No net. Just your body and a racquet. Step across with your lead foot, rotate your shoulders, and drop the racquet into the slot behind your hip. Freeze at each phase to lock in the sequence.
2. Wall Drills with Straight-Arm Contact
Stand a few feet from a wall and hit soft one-handers, focusing on keeping your arm fully extended at contact. Use chalk or tape on the wall to mark your ideal contact zone.
The goal: clean contact with a full reach, no jammed elbows.
3. “Hold and Lift” Finish Freeze Frames
After shadow swinging, hold your finish and check: is your racquet high? Did your non-dominant arm stay back? Are you seeing under your strings? This drill teaches you what a complete stroke feels like and locks it in.
Intermediate Progressions
If your one-hander feels decent but still lacks whip or spin, these drills will help you add lag, lift, and timing.
1. racquet Lag & Release Drills with Cones
Place a cone behind your lead hip. As you shadow swing, aim to drop the racquet head behind the cone before swinging forward. This helps train the lag position – aka the power window.
2. Left-Hand-Guided Drop Swings
Start every swing by pulling the racquet back with your non-dominant hand. As you release it, let the racquet fall naturally into the slot. This builds rhythm, consistency, and a smooth transition into the swing.
3. “See Under the Strings” Check
During reps or wall drills, freeze your follow-through and check if you can see under your strings. If you can’t, your swing path is too flat, focus more on lifting up through the ball.
Advanced Control Builders
If you’ve got a reliable backhand but want to add shot variety and precision, these drills are your next step.
1. Topspin vs. Slice Alternation Drills
Alternate between one topspin backhand and one slice, focusing on the swing path, contact point, and finish. This helps you develop disguise and build shot-to-shot adaptability.
2. Slot Acceleration + Follow-Through Snap
From the slot position, explode forward through contact and snap up into a high finish. Think controlled whip. Keep reps small and deliberate, this is about feel, not speed.
Ready for Real Feedback?
You can practice solo all day, but at some point, feedback from real coaches accelerates growth faster than reps ever will.
Join our community to submit your swing, get personalized video analysis, and finally build a one-hander you can trust under pressure.
Absolutely—here’s a slightly shortened but still detailed version of the section that keeps all key points while tightening the flow:
Should You Switch from Two-Handed to One-Handed?
Thinking about trading in your two-hander for the elegance, reach, and versatility of a one-handed backhand? For the right player, it can unlock creativity, disguise, and a whole new layer of control.
But for others, it’s a tough transition filled with early mis-hits and timing struggles.
Here’s how to know if it’s the right move for you.
Signs You’re Ready to Switch
You might be ready if your two-hander feels cramped, especially on wide balls, or if you’re already slicing most of the time and want to turn that wing into an attacking shot.
Many players also make the switch due to wrist or elbow injuries aggravated by the two-hander.
And if you’re an advanced player seeking variety or a stylistic change, the one-hander may be a perfect fit.
What the One-Hander Asks of You
You don’t need to be in pro-level shape, but you do need:
- Shoulder strength to control the racquet through contact
- Core stability for balance during the swing
- Wrist and forearm flexibility to adjust to different heights
- Refined timing since there’s no second hand for support
These skills are all trainable. And once the muscle memory is built, the stroke becomes smooth, fluid, and surprisingly low-maintenance.
What the Transition Feels Like
Expect a learning curve. Early on, your timing will be off, especially on high balls, and the shot may feel unreliable. That’s normal.
But with 6–8 weeks of focused practice, and the right progressions, you’ll begin to feel the rhythm. Most players find not only improvement but enjoyment.
The one-hander feels good when it’s right, and more importantly, it starts winning you points.
Worry: “Is It Too Late for Me to Learn a One-Hander?”
Absolutely not. We’ve helped players in their 40s, 50s, and even 60s make the switch.
If you’re motivated, open to learning, and willing to put in the reps, age is not a barrier. Many older players prefer the one-hander for its fluid motion and reduced strain on the body.
So if you’re considering the switch, now may be exactly the right time, not someday down the line.
Build a Weaponized One-Hander
You’ve seen how grip, footwork, swing path, and contact all come together. You’ve learned what to avoid and how to fix the frustrating patterns that have held your stroke back.
But knowing the mechanics isn’t enough.
The players who see real transformation don’t just study, they train with a plan, they practice with feedback, and they stick with it long enough to groove the motion. That’s where we come in.
👉 Our membership now gives you everything you need to improve your game, from guided backhand challenges and video courses to live feedback and personalized drills.
If your one-hander still feels shaky, or you just want to fast-track your progress. this is your moment.
